Thursday 29 September 2011

Yummy Scrummy Carrot Cake

Remember those carrots I plucked out of the ground earlier this week?
(Pause, whilst you scroll down & find them..... Yeah those ones)
Well I do love making delicious dishes centred around my veg, so I am treating you to a tried & tasted carrot cake recipe, involving my precious carrots.
I have made this carrot cake today for numerous reasons.
1. The boyfriend is coming home for the weekend & I like to bake fatty treats for him (he needs fattening up, skinny as a rake).
2. It is one of my best friends birthdays next week, & what better reason for cake?
3. My mum has an addiction to any form of carrot cake, but especially if it is home made.
So in honour of those 3 people, here it is:


Ingredients
- 175g Light Muscovado Sugar
- 175ml Sunflower Oil
- 3 Large Eggs, Beaten
- 140g Carrots, Grated
- 100g Raisins
- Grated Zest of 1 Large Orange
- 175g Self Raising Flour
- 1 Teaspoon Bicarbonate of Soda
- 1 Teaspoon Cinnamon
- 1/2 Teaspoon Ground Nutmeg

& For the Icing
- 175g Icing Sugar
- 2 Teaspoons Orange Juice (From Above Zested Orange)

1. Preheat oven to 180C/Gas 4/Fan 160C. Oil & line the base & sides of an 18cm square baking tin with greaseproof paper.
2. Tip sugar into large mixing bowl, pour in oil & add eggs. Lightly mix with a wooden spoon, then stir in the grated carrots, raisins & orange rind.
3. Mix in the flour, bicarbonate of soda & spices. The mixture should be pretty soft, almost runny in fact.
4. Pour mixture into prepared baking tin & bake for 40-45mins (until it feels firm & springy when you press the centre). Wait for the tin to cool for a couple of minutes, then turn it out onto a wire rack & peel off the paper. 
5. Mix together the icing sugar & orange juice until smooth. Put the cake on a plate & drizzle the icing over the top. Then cut up & eat!

Om nom nom.

How to Save Sunflower Seeds

It's about the time of year when Sunflowers begin to dry out, & you can call me selfish but I really don't want the birds to get ALL of the sunflower seeds that drop out of the heads of my flowers & on to the ground. I have therefore covered the head of each of my sunflowers with the end of an old pair of tights:


This may look odd, but this way all the seeds are collected in the foot of the tights & the birds can't get to them before I do. I will save some of the seeds from the biggest sunflower for planting next year, & the rest of the seeds I will save to put in a bird feeder over the winter months. 
It is important that if you do this you use a material that is not too heavy for the flower heads, thin enough for dew to evaporate quickly from, but thick enough so that the birds don't peck through & pinch the seeds you are collecting. This is why I have chosen an old pair of tights, as it fits this criteria. 
It is far better to collect seeds this way than to cut the head off the flower, as the seeds drop once they are fully formed, so cutting the head off will stop the seeds reaching their full potential. Cutting the head off of the sunflower will mean that when you plant the seeds out after collecting them, only about 60% of the seeds will grow. However, collecting the seeds when they drop from the flower that is still in the ground will mean that about 97% of your seeds will grow up to be strong & beautiful sunflowers!

Tuesday 27 September 2011

A Gardening Playlist

I love to listen to some music when I am working hard in the veg patch, but the radio cable will just not stretch to that end of the garden. I have taken recently to just listening to music on my iPod. I mainly listen to playlists, so I have had the idea of making a small 'Gardening' playlist, & here are it's contents:

1. Tree Hugger by Antsy Pants & Kimya Dawson
2. Here Comes the Sun by The Beatles
3. Song for Sunshine by Belle & Sebastian
4. Don't Worry, Be Happy by Bobby McFerrin
5. Dig It by D Tent Boys
6. Sunchyme by Dario G
7. The Yeah Yeah Yeah Song by The Flaming lips
8. Welcome to the Jungle by Guns N' Roses
9. Rambling Rose by Isobel Campbell & Mark Lanegan
10. Flowers in the Rain by Kaiser Chiefs (Cover)
11. Sunny Afternoon by The Kinks
12. Let the Sun Shine by Labrinth
13. What a Wonderful World by Louis Armstrong
14. Earth Song by Michael Jackson
15. Dig, Lazarus, Dig!! by Nick Cave & The Bad Seeds
16. I Got Life by Nina Simone
17. A Force of Nature by Oasis
18. A Kind of Magic by Queen
19. The Animal Song by Savage Garden
20. Make Me Smile (Come Up & See Me) by Steve Harley & The Cockney Rebels

This is the first of many playlists.
Keep having a spy for randomly themed playlists I will kindly put together.
Enjoy!

My Window Sill Take Over!

Unfortunately we are coming up to winter already. I do not have a greenhouse & I have planned ahead by making sure I have some indoor plants to nurture & fuss over during the cold period where I am likely to spend less time outdoors in the veg patch.
The window sill in our kitchen is a perfect home for my indoor plants, so I have completely taken over. I currently have 2 little apple tree beauties, which I have grown from the seed of an apple from the tree in my garden:


I have actually been told that more often than not, when one plants apple trees from seed they do not produce fruit, which is a little disappointing. However, I may as well try. Also, I do quite like the idea of being an OAP & being able to point to the bottom of the garden & tell my grandchildren that the two apple trees they see, I grew from a seed. It's all very heart warming & pleasing.
I am also currently fussing over my first chilli plant:


Isn't it a beauty? This attractive number was kindly donated to me by my best friends dad, who was equally excited that I had started growing my own veg, as he is obsessed with his veg patch too! Admittedly he has been at it for years, & is WAY more experienced than me, so he grew this plant from seed then donated it to my cause, & I am very thankful.
And guess what? It's just started flowering! How very exciting! 
No doubt there will be further blog posts to follow, concerning the progression of this plant, it's pretty special to be honest.

Soil

Does it go without saying that soil is a really important part of growing healthy veg? Probably.
However, the soil in my veg patch is a constant source of disappointment to me. I regularly treat it to a cheeky feast of nutritious compost, but it's just never enough. Now, if you have soil like this you need to realise that it will take a few years of fertilising, crop rotation & general TLC before the quality of your soil is up to scratch. 

BUT all is not lost, oh no! I am a huge fan of this little number:


This is my new best friend, Seaweed Fertiliser.
 I live nowhere near the sea, so I am unable to gather my own seaweed from the beach. But, thank goodness, The Fair Traders Cooperative has done it for me, in the form of an organic, biodegradable & sustainable bag of nutritious goodness. 
This was actually in their gardening sale, so it only cost me £4.97 for a 2kg bag, which will last me a year or so.
All you have to do is scoop a couple of cups of the seaweed granules into a pair of old tights (preferably the leg which is un-laddered....), then soak it in a gallon or 2 of water for 3 months. 


Then all you need to do is give your veg patch a good soaking (but be careful not to make the mixture too strong, as you can burn the roots of your plants, & we can't be doing with that).
It's like one giant tea bag, loaded with vitamins & minerals for your plants! Also, seaweed is an excellent compost activator, so once I'm done with this lot of seaweed, I can just add it to my compost heap, so no wasting of it!

If, like me you live nowhere near the sea, you can buy it right here, cheap as chips.

I can almost hear my soil & veg saying "om nom nom"!


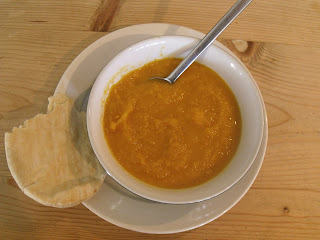
Winter Root Veg Soup


So, having just uprooted my first ever batch of carrots, I want to make use of their deliciousness. I have settled on this recipe for soup, which was SO unbelievably easy, & I didn't even have to buy any ingredients in specially. I tested it out on my friend Helen, who seemed to enjoy it (though she may have just been polite....). I enjoyed the making & the eating part anyway.


Ingredients:
- 2 Tablespoons Olive Oil
- 1 Onion, Chopped
- 3 Cloves of Garlic, Finely Chopped
- 32 Fluid Ounces Veg Stock
- 2 Tablespoons Apple Cider Vinegar
- 1 Sweet Potato, Peeled & Chopped
- 1/2 Turnip, Peeled & Chopped
- 4 Carrots, Peeled & Chopped
- 1/2 Butternut Squash, Peeled & Chopped
- 1/2 Teaspoon Ground Ginger
- 1/2 Teaspoon Salt
- 1/4 Teaspoon Cumin
- 1/4 Teaspoon Curry Powder
- 1/4 Teaspoon Cinnamon
- 1/8 Cayenne Pepper

1. Heat oil in pan over a high heat. Add onions & fry until soft. Add garlic & fry for 1 minute more. 
2. Add all other ingredients, then cover & leave to simmer until root veg is soft.
3. Remove from heat, blend until smooth. Serve hot.

Easy as 1, 2, 3!

We Love Apples!

The apple tree in my garden is producing apples like there's no tomorrow! I am a huge fan of anything apple based, but there's only so much apple crumble one person can eat!


Last year the tree was producing loads too. In the past year I have recently got into wine making. With last years apples I made Apple & Blackberry wine:


It's a dead easy recipe if you're into wine making (which you should, because it turns out to be much cheaper than buying wine from the supermarket, especially if you're a regular wine drinker). 

Equipment:
- Fermentation Bucket (With Lid)
- Demijohn with Cork & Airlock.
- Bottles

Ingredients:
- 8lbs Apples
- 4 1/2 Pints of Water
- 2lbs Sugar
- 1 Campden Tablet, Crushed
- 1 Sachet of  Wine Yeast

(You can buy the Campden Tablets & Wine Yeast from Vintners Harvest. Wine making equipment you can get from The Home Brew Shop)


1. Wash and sort your apples. Use only solid firm fruit. Cut your apples into smaller pieces & put in the fermentation bucket.
2. Add your crushed Campden Tablet (this will help with the clearing of your wine). Boil the water, then add this, stirring in the sugar one scoop at a time.
3. Add your yeast and cover your fermenter. Stir your wine every day for about a week.
4. Strain the liquid through some tights, leaving any apple chunks behind (but make sure you squeeze all the liquid out of the apples before you chuck them away).
5. Now siphon your wine into the demijohn, fitting the cork & airlock (don't forget to fill the airlock half way with water before fitting).
6. Leave your demijohn in a relatively warm place (mine is in front of the boiler tank) for about a month, or until the airlock stops bubbling. 
7. Sediment will have settled on the bottom of the container. We don't want this in our wine, use a cut off bit of hose to siphon your wine off the sediment into a clean demijohn, & reattach an airlock.
8. Wait about 2 months and then siphon your wine off the sediment again. Keep doing this until your wine is clear. If it is clear now then it is time to bottle.
9. Let wine set for a couple of months before drinking.

Et VoilĂ !

New Goodies!

I do like to make my garden look good, even down to the finishing touches, like the labels for the veg. So I have treated my veg patch to some new goodies:

These wooden plant markers are made in Moradabad, & the producers are members of WFTO (World Fair Trade Organisation), so working conditions are monitored. I try to buy fairly traded products where possible, as I know that the artisans enjoy good working conditions, good wages, steady employment, schooling for their children & clean water. You can buy these here, where you get 10 markers for £4.95. At the same time I also treated myself to a cute seed tin:


This holds all of my packets of seeds, which is obviously an essential quality in a seed tin. It is made by the same people who make the wooden plant markers, so it's also Fairtrade. You can get this here for £4.95. Well worth it if you ask me.


My New Plum Tree

Today I am welcoming my new plum tree to the family. 


It's looking a bit sorry for itself at the moment, but I think that's mainly because it's been in a pot for a while & needs planting in the ground.
I often go to an auction up at New Mill church hall, where they have house clearance furniture & stuff. A lot of the time they also have plants, like my little plum tree. I only paid £10 for it, where I could have paid £15 at a garden centre. I would definitely recommend scoping out your local house clearance auctions for this sole purpose. The other month I bid on 2 crates of strawberry plants, but didn't end up winning.  

Monday 26 September 2011

Carrots

I know it looks odd, but I have built a makeshift wall around my precious carrots to prevent root fly. My gardening neighbour informed me that the cheeky beggars can jump a little bit off the ground, then burry down beneath the soil & destroy the carrot crop! He recommended that I build a sort of barrier around the crop:


I planted these in February, straight in the ground. I also dug a bit of sand in this section of my veg patch, because carrots like their soil more on the sandy side. I have monitored them, & when the tops peek up from the soil, it's around this time that the carrots are ready. I planted mine in 2 stages, to produce a longer crop. Here's the 1st half:


& no root fly! Looking gooooood!

Oh What A Beautiful Mooooorning!

Today was such a beautiful day, that I couldn't resist picking a bunch of flowers from the garden.


Included are carrot tops for greenery & chive flowers supply the purple, I'm not entirely sure what the orange flower is, but it was looking good at the top of the garden, so I threw that in too. Not that the kitchen was gloomy, but it cheered the room up lots, & the majority of it is from my veg patch!

Courgettes

When I first started my veg patch I had decided I would grow courgettes at some point, because I am a huge fan of them. I actually grew them from seed, like most of my veg. I was very excited when they started flowering, as my gardening pals had informed me that I was not far off from seeing my first courgette. HOWEVER, when my gardening buddies started bringing me huge marrows to enjoy, I was lamenting at the fact that I still saw no sign of a courgette. But now, months later than they should have been growing:


A courgette! How exciting!
I read recently that when the courgettes start growing you should place a clear bottle of water beneath the plant. This heats the water during the day, so that the courgettes stay warm during the night, helping them to grow bigger.


So.... I will be picking a couple of courgettes when they are about as thick as my thumb, then leaving a couple of the others to grow up to be marrows (I have a great recipe for marrow chutney, which I will share at a later date). VoilĂ , easy veg.... sort of.....

The Veg Patch

Let me introduce you to the veg patch:


This has been going for about 8 months now. In the ground at the moment I have:
- Butternut Squash
- Beetroot
- Courgette
- Pumpkin
- Broccoli
- Cauliflower
- Onion
- Leek
- Carrot
- Broad Beans
- Cabbage
All of which I have planted from seed, rather than buying the plants from a garden centre. I like to do this because then the veg is really MY veg, having nurtured it from nothing.
Before planting anything into the ground I persuaded my boyfriend to help me dig compost into the bed. I would recommend doing this the same way I did. This is splitting the patch down the middle, then splitting each half into 4 sections. You then dig out one section, piling the soil onto the section behind you. You then dig compost into the bottom of the hole you have dug (manure is fine too, but we have a huge pile of compost in the garden which was begging to be used). Next you dig from the section in front, piling that dirt into the previous hole, & so the cycle continues until finished. This took the 2 of us a full day of digging, but I would advise that you break it down over a few days, because our backs were killing us for the next week! My soil is now much healthier than it was, but I intend on doing the same again over winter, when I don't have many things growing in the patch, so I can up the quality of my soil once more.

Tomatoes

As a beginner gardener it's great to have so many friends who are already in to gardening, because they donate seeds and plants to you. Like these tomato plants, kindly donated by my Auntie Sue:


Now, I have literally NEVER grown anything before (save the generic basil plant on the window sill, which actually died more often than not), & I was told that tomatoes are a good veg to start with. They are so easy to look after, all I have done is shove a stake in & tied them to it with wool, & pinched out the little leaves growing between where the branches meet the stalk of the plant (this helps the plant to grow more fruit). No fertiliser, no pesticide, & no slug pellets. Easy peasy, & look at them now!


It's so easy for me to get excited about tomatoes! Especially when you grow your own!

The Beginning

WELCOME!


Hello, my name is Sophie Bebb, I am 22. I am a beginner gardener, & setting up this blog is my way of saying "Hey, if I can do this, anyone can!". Here you can accompany me on my learning curve towards a more eco-friendly and sustainable lifestyle. So sit back with a brew & enjoy my mishaps & triumphs in my veg patch :)