Wednesday, 29 August 2012

How To: Make Bilberry Wine

I live in the lovely countryside of West Yorkshire, and 'round these parts we have tons of bilberry bushes. Now, for those of you who don't know what a bilberry is, it's a bit like a blueberry but smaller and tastes a little less sweet, but still delicious.


Normally, our family goes bilberry picking together on the weekend of my mums birthday, which falls in early July. However, because the weather has been so ridiculous this year the bilberries are only just coming out now, in late August. So, off I went to get me some bilberries.

Usually we make either bilberry jam, or a few bilberry crumbles. This year I thought I'd give bilberry wine a go...

I make my own wine regularly, but I have realised that I have only ever blogged about it once, which was a while ago, so I thought I'd do some wine recipe sharing again :)


Equipment:
Fermentation Bucket (with lid) Demijohn with Cork and Airlock Wine Bottles

**All equipment MUST be sterilized before you start the process, I cannot stress this enough**

Ingredients:

3 lbs. Bilberries/Blueberries (if you can't find a bilberry bush)
4 1/2 Cups Sugar
1 Teaspoon Pectic Enzymes
1 Campden Tablet
1 Packet Wine Yeast
1 Teaspoon Potassium Sorbate

1. First things first: clean and disinfect ALL your tools AND your wine making area.

2. Clean and crush the bilberries.
3. Fill up the fermentation bucket up with your bilberries and water (up to the one gallon mark).
4. Add sugar and yeast.
5. Stick the lid on it.
6. Stir every 24 hours for a week.
7. Siphon (or "rack") the wine from the bucket to the demijohn and seal with the airlock.
8. Once the airlock has stopped reacting, add Potassium Sorbate to your wine.
9. Allow wine to settle for at least 3 days.
10. Bottle it.

30 days is the minimum time you should allow for the process. If you wait longer, your wine will taste better. My advice is once you bottle the wine, let it sit for between 6 months to a year.

It's so easy. Honestly. If I can do it, anyone can.

Tuesday, 28 August 2012

It's Almost That Time of Year Again...

Well hello there! 
So, I haven't done a blog post in a little while and I've decided to blow off the cobwebs and get back into it! Apologies for my brief absence, what can I say? I'm a busy bee!

Last week my mum received a very odd text from a neighbour of ours simply asking "Do you want a cabbage?". Of course we did! So a few hours later a huge cabbage, fresh from their garden, was sitting next to our kitchen sink. Lovely.


We have been gradually munching our way through it all week, but there's only so much cabbage one can eat with dinner. 

Lately the weather here has been a bit iffy, you can tell Autumn is on its way already, and today was looking a bit grim. A friend of mine came round for lunch (we like to pretend we're classy that way, being 'Ladies What Lunch' and what-not), and there's one classic meal that can comfortably ease you into the Autumnal weather - soup!

Therefore, with the remaining bit of cabbage, I give you.... MINESTRONE SOUP!


Ingredients:
3 Large Carrots, Chopped
1 Large Onion, Chopped
4 Celery Sticks, Chopped
1 Tablespoon Olive Oil
2 Garlic Cloves, Crushed
2 Large Potatoes, Cut into Small Chunks
2 Tablespoons Tomato Puree
2L Vegetable Stock
400g Can Chopped Tomatoes
400g Can Kidney Beans
140g Spaghetti, Snapped Short
1/2 Head Savoy Cabbage, Shredded

1. In a food processor whizz the carrots, onion and celery into small pieces.
2. Heat the oil in a pan and add the processed veg, garlic and potatoes over a high heat for 5mins until softened.
3. Stir in the puree, stock and tomatoes. Bring to the boil then cover and leave to simmer for about 10mins.
4. Tip in the beans and pasta then leave to cook for a further 10mins.
5. Add the cabbage for the final 2mins.
6. Season to taste.

As with most soups, this goes down very well with crusty bread, especially Black Olive and Rosemary Bread, a recipe from an earlier blog post.

Lovely jubly.

Friday, 13 July 2012

SOPHIE POWER!

I have been an Oxfam supporter for a while now. Their most recent campaign is all about enough food for EVERYONE across the globe, & how OUR actions can help with the equality.... It's called GROW! 

Anyway... Oxfam recently asked me if THIS cheeky little blog would feature in their little booklet to promote the GROW campaign to festival goers. Of course I said yes!

Have a little read! 


Enjoy :)

Tuesday, 12 June 2012

fairandfunky CIC

Huzzah! Some of you may or may not know that I have just set my own exciting Community Interest Company with my very good friend, Helen Robinson. Here is a bit of something, something to tell you all about what we do!

fairandfunky was officially launched at an event in Holmfirth this month. 


fairandfunky is a community interest company with the mission statement: “empowering people to take little steps to change the world”. We chose to be a community interest company as we are more that just an ordinary business. Our profits will be reinvested into the company so we can deliver workshops for free to disadvantaged community groups, develop a fairandfunky festival and eventually train and employ local people.

We believe that as individuals we have the power to make a positive difference in the world. Through the way we act, what we wear, where we shop and what we do. fairandfunky enables people to make those positive choices and empowers people to take their own little steps to change the world. We do this in 2 ways:

1. fairandfunky pop up

All of our products are fair and funky. They are either recycled, fairly traded, or organic - sometimes all 3. We work with suppliers who can tell us where the product was made and by whom. We sell a range of gifts as well as homeware, jewellery, soft toys, books and soaps. This range will grow and change as fairandfunky grows.

We are thrilled to be able to announce that from June 2nd fairandfunky products will be available to buy from Avid Farmshop in Hazlehead. With thanks to Karen we have been able to fill her shelves and fairandfunky has a residency.


But we do also pop up with our products at festivals, events, markets, and at home. We’re always interested in new ideas so do let us know if you have a good one!

2. fairandfunky workshops


Our main source of income and focus is our workshops. We deliver interactive workshops on 3 key global themes: recycling, the environment  and Fairtrade; to schools and community groups. The workshops are adapted to suit either KS1 or KS2 and educate children on the issues presented by these 3 key global themes. The workshops range from creative arts to debates; from roleplay to junk modelling with a difference. All of which are suitable for a school based environment and youth groups such as guiding and scouting.

The workshops are available from September 2012. Do get in touch if you’d like to book one.

fairandfunky website


Working with We are Coda we have developed our brand and have a new website! At the moment you can sign up to our newsletter, and find out more information about us, but we are hoping that the site will be developed into a selling site very soon, so watch this space!

We are looking for funding to be able to progress to a selling website before Christmas. If you know of any funding opportunites that you think fairandfunky will be able to access, please let us know.

We are also on Twitter and Facebook

Thanks for your support!

Thursday, 7 June 2012

Your Daily Dose of Cute

These cuties are in a field right by my house & I WANT THEM! I have made friends with them all, & just thought you could too!


Wednesday, 25 April 2012

How To: Make Lovely Presents for Lovely Friends

I don't know about you lot, but April/May time is always busy for me.... Everyone I know seems to be either having a birthday, having a baby, or moving house. I don't know what it is about this time of year, but everyone just seems to be loving it! Of course it also means gifts all round, & when it's all in one go it can get pretty expensive. But never fear! I have a lovely answer to this problem. Who doesn't like receiving plants that they can make use of?


I recently started a new pot of chili peppers, and the pot is getting a bit crowded now, so I decided to split these seedling up into smaller pots.


Now, I don't REALLY need more than one chili plant in the house, so I'm giving them away for presents this month!
I hate waste, & love a cheeky bit of recycling, so I have used tin cans for this project. I found that cans with ring pull tops were best for this, because it meant the edge wasn't so sharp, so no cuts (I used cat food tins in this case. Washed, obviously).


Next, use a nail & hammer to pierce at least 5 small holes in the base of the cans (please be careful children!), so that when watered the plants can drain & not drown.


Then fill the tins with compost & pop in the seedling.


Last, to make it look presentable as a gift, tie a bow around the middle. I used material scraps to give that rustic look, & you can't go wrong with recycling!


Lets hope my lovely friends like their lovely gifts, & I hope you enjoyed this project!

Monday, 23 April 2012

Getting My Broad Bean Action On

At about October time last year I planted some broad beans straight in to the ground, as I had read that if you do this at the optimum time they will grow over winter & you can get an early crop of beans. I thought I'd give it a go, nothing to loose, right? They're not supposed to start flowering for a month or so yet, but LOOK!


It's always very satisfying when you're testing something out & it actually works. It's even more satisfying when your neighbour also tries it out, & yours look better (I'm not a nasty person, but there's a bit of me that's very smug right now...).
I hope I haven't jinxed it, but hopefully in the next few weeks I'll have some broad beans to chow down on! Excitement!

Rain, Weeds & A Cheeky Teapot!

It has been raining ALL day, EVERY day, for the past week or so.


This morning there seemed to be a break in the grim weather, so out I went to the veg patch, & guess what? The weeds were LOVING this weather! I had more weeds in my veg patch than actual vegetables - & I'm not even exaggerating! They were thriving from all this moisture (if only the vegetables would take a leaf out of the weeds book...).
SO, out came the teapot!


No, not for a brew, but to deal with the task at hand in a different way than cheering me up with a lovely cuppa.
I learnt this trick when I watched my Granddads neighbour whip his teapot out the other week.
Fill your teapot with boiling water (minus the teabag), out you go to the garden, & pour it directly on to the weeds. It will wilt the leaves & kill the roots, without you having to use any nasty weed killing chemicals near your lovely veg!
You may need one or two trips to & fro, but it's worth it in the end.
Just be careful not to get any on your veg or flowers, or it will have the same effect on them too, but if you're cautious enough..... 
Job's a good 'un. 

Spring is Sprung!

March & April are the optimum months to get planting your veg. You have to keep a watch out for the last frost (which for us, happened to be 2 weeks ago), then you can get busy in the garden! I spent a good 3 hours in the Bebb veg patch this afternoon & planted the following:


- MORE onions.
- MORE leeks.
- Beetroot.
- Peas.
- Parsnips.
- Spinach.
- Sweetcorn.

It's my first year trying out sweetcorn, so fingers crossed, & we'll see how that bad boy turns out!
Already in the ground were:

- Onions.
- Leeks.
- Garlic.
- Broad Beans.

:)

Sunday, 15 January 2012

Leeks

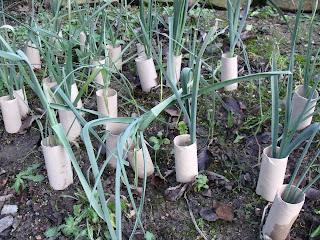
I just quickly want to share with you a quick tip I picked up off a friend of mine this week concerning leeks. 
I have never grown leeks before, & when I went to my friends house for a brew she showed me hers. They all had toilet rolls resting around the base. When I questioned her about it she told me that it was so that when the leeks grew there would be more of a white bit (the bit you eat the most of), therefore getting the most out of your leeks. 


Nifty, right?

Monday, 9 January 2012

How To: Make A Paper Seed Pot

As most people know, I am quite the environment nerd. So when it comes to gardening I do my best to recycle & give back to the earth. I have long since been in possession of one of these:


I bought it here & this is what it does:

1. Cut strips of newspaper about 3inches wide.


2. Take a single strip, and place the cylindrical block at one end, in line with the line on the block, with about an inch or so of the paper hanging off the bottom of the block. 


3. Start wrapping the strip round & round the block, until there is no paper left to roll with.


 4. Turn the block upside down, and fold over the excess paper hanging off the bottom, so that the base of the block is covered.


5. Turn the block back to the correct way up, then using the circular block of wood, twist down with the paper and block, adding a little pressure. This will twist together the base of the paper pot.


6. Slide the paper pod off the block, & continue to make more paper pots until you have the amount you need.


7. Add soil, seed & water (like you would a plastic seed tray), & watch your plants grow! 


Because of the fact that the paper will eventually rot away, these can be placed straight in to the ground, so there is no faffing about in getting them out of a plastic tray!

Best thing since sliced bread in my opinion!

Tuesday, 3 January 2012

New Books!

I am one of those lucky people who has a birthday right next to Christmas, so I have to get all my book requests submitted in one go. This year I received the following:

1. The Thrifty Forager by Alys Fowler
Alys Fowler is the gardening journalist for The Guardian, & she is just GREAT! She has a few books, but this one is the bees knees! It is great on where & when to do your best foraging, with pictures to guide you, as well as cute little illustrations.

2. The Faber Book of Gardens edited by Philip Robinson
My lovely boyfriend knows exactly what I love best - reading & gardening. This book combines the two in the best way possible. It is a compilation of poems, prose and articles on 'the garden' from The Garden of Eden to The Eden Project! I don't think I have ever loved a book more.

3. Grow your Own Month By Month by Jo Whittingham
This book is so great for novices like me. It gives the perfect step by step guide on what to plant, sow, harvest & generally DO in a picture perfect month by month guide. In fact, it allows you to do exactly what it says on the tin! Perfect for the beginner gardener.

4. The Flavour Thesaurus by Niki Segnit
I have been asking for this book for SO long! It throws all other recipe books out of the window. If you like to improvise a lot in the kitchen, this is the book for you. If you have a look at what you can forage from the fridge, then have a look in this book, it tells you which flavours work best with said ingredient, and why it tastes so good. My copy is signed, which is even more exciting. Another brownie point for the boyfriend!

How To: Make Sloe Gin

Happy New Year to one & all!
To celebrate lets make some celebratory sloe gin together!

On Boxing Day this year I went on a lovely walk with my wonderful family. My mum has never known what a sloe looks like so for those of you who are in the same boat, here they are:


Sloes are the fruit of the blackthorn, and look like small, marble-shaped plums hanging in clusters.

You will need to pick about 1lb of sloes to make 1litre of sloe gin, but try not to pick from the top of the bush, leave some for the birds to guzzle over winter!


Ingredients:
1lb Sloes
8oz Caster Sugar
1litre Gin

1. Prick the sloes with a needle & transfer into a sterilised bottle.
2. Pour in the sugar & the gin (or get my mum to be so excited by the prospect of gin that she wants to do it...).


3. Seal tightly & shake well (again, my mum doing the hard work...).


4. Store in a cool dark place & shake every other day for a week. Then shake once a week for at least 2 months (or get the boyfriend to do it, whilst you take pictures....).


5. Strain the sloe gin in to a sterilised bottle.
6. SUCCESS!